App-V 5.0: Add publishing server.
Simple PS script to add a publishing server.
Import-Module AppVClient
Add-AppvPublishingServer -Name <name> -Url http://<hostname>:<port>
MUCH better so far microsoft, MUCH better. Now it just needs to be reliable (something you can't really judge with a beta).
App-V: Completely Redesigned Server Coming In 2012?
Little birdie mentioned that there will supposedly be a completely re-written App-V Server coming maybe around Summer 2012.
Can't really say who or what, and I may have missed the memo that made this obvious, but here's hoping for a PROPER server, with actual admin features.
App-V: SFTMIME.EXE REFRESH SERVER
SFTMIME.EXE is one of the two primary command line utilities you will find yourself using to programattically control App-V. SFTTRAY.EXE being the other.
SFTMIME's main purpose is controlling the client, as where SFTTRAY's main purpose is launching applications. It goes beyond that but in a nutshell those are their jobs.
One problem you may see with SFTMIME is a lack of response. In this instance REFRESH SERVER, when when used with /log provides no response unless there is an error. Most people go into the Client Console and refresh to see if the server status changes to "Ongoing", and if it doesn't change assume it didn't work. The only way to ensure it kicked off a refresh is to check C:\ProgramData\Microsoft\Application Virtualizaton Client\sftlog.txt
If you see it cycling in the log, you know it worked. This doesn't do wonder for programattically checking, as even looking at the modified date of sftlo.txt doesn't tell you anything other than SOMETHING happened. You have to actually parse the log file to get a clear result.
If you intend to run SFTMIME via scripts or something like SCCM don't forget to specify /LOG <pathname> otherwise if it fails, you are left to scratch your head and wonder why.
XenServer: Add/Remove Network Interface.
Remove:
- xe vm-list
- Copy the uuid for the VM you want to remove the interface.
- xe vif-list vm-uuid=<vm-uuid>
- Copy the uuid for the vif you want to destroy.
- xe vif-destroy uuid=<vif-uuid>
Add:
- xe list-network (you can add "name-label=<label>" if you know the networks name, in my case Bond 0+1)
- Copy the networks uuid.
- xe vif-create network-uuid=<network-uuid> vm-uuid=<vm-uuid> device=#
See above for how to find the VM's uuid, for device replace # with the device number, you can find a list of supported VIF devices by typing "xe vm-param-list uuid=<vm-uuid> | more" and looking for allowed-VIF-devices, if theres no interface currently on the VM you will most likely use 0.
As for why you would want to do all of this...well, sometimes you either don't have access to XenCenter, or it decides it doesn't want to play, it's always a good idea to bring your own ball.
App-V: Error Code 0000C800
Along with the other information floating around I have also found that if you install the App-V server on a different server than the SQL DB is hosted you need to ensure you have delegation enabled on that machine.
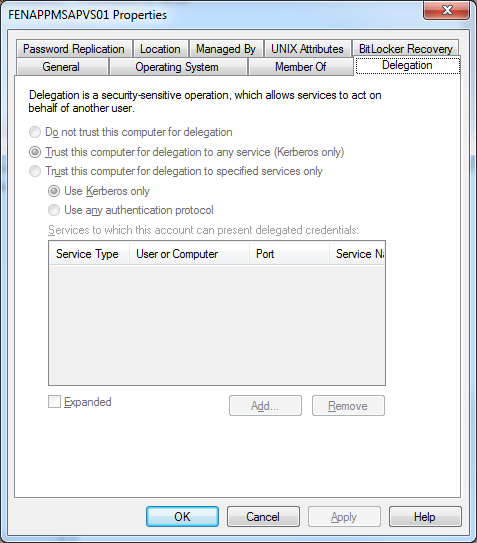
Failure to do so will result in the username/password that you connect to the server with being lost on the next hop to the SQL server. The resulting Access Denied will be a result of the SQL server, not the AVS, denying access to what is essentially an anonymous NT Authority account.
XenServer: Join A Domain.
xe pool-enable-external-auth auth-type=AD service-name=<domain.com> config:user=<username> config:pass=<password>
XenServer: Add search domain to DNS.
xe pif-list host-name-label=<hostname> management=true
xe pif-param-set uuid=<uuid> other-config:domain=domain.com
reboot
hostname -d -v
Should show the search domains at the bottom.
Alternatively:
cat /etc/resolv.conf
XenServer: PXE Boot failure/solution.
So trying to boot off PXE on a XenServer VM seems to VERY frequently cause problems. I finally figured out how to work around the issue.
When booting from network (you probably need to bump network boot up above the "will not boot" line) hit Ctrl+B when it says to bring up the gPXE command line. Then do the following.
- dhcp net0 (or whatever adapter you want to use)
- config
- set "next-server" to the tftp server location (this is where all your boot images are) use the IP ot hostname.
- set "filename" to the path to the correct .com file. In my case I had to bypass the OSChooser and set the path to Boot/x64/wdsnbp.com
- Ctrl+X
- autoboot
- You should see it load the image and continue.
Note that you NEED to know the location where the images are stored and be able to see them so you know what file to point it to. If you can't figure it out, start pointing it to every .com you can find lol.
Also beware that on reboot these settings are NOT saved. Which is annoying. But hey, it beats flat out not being able to RIS.
RSAT: Enable via Powershell
You can use wusa <path to .msu> /quiet to install the update, then run this powershell script to enable all the features for RSAT.
&$env:systemroot\SysNative\dism.exe /Online /Enable-Feature:IIS-WebServerRole&$env:systemroot\SysNative\dism.exe /Online /Enable-Feature:IIS-WebServerManagementTools&$env:systemroot\SysNative\dism.exe /Online /Enable-Feature:IIS-IIS6ManagementCompatibility&$env:systemroot\SysNative\dism.exe /Online /Enable-Feature:IIS-Metabase&$env:systemroot\SysNative\dism.exe /Online /Enable-Feature:IIS-LegacySnapIn&$env:systemroot\SysNative\dism.exe /online /get-features | Select-String -Pattern remote* | %{$Exec = "dism.exe /online /enable-feature /featurename:RemoteServerAdministrationTools /featurename:" + ($_).ToString().Replace('Feature Name : ',''); Invoke-expression $Exec}&$env:systemroot\SysNative\dism.exe /Online /Enable-Feature:RemoteServerAdministrationTools-Roles-AD-DS-AdministrativeCenter
via Xenophane
Update: If you don't want the SMTP Server Tools installed you can ditch the dism lines that turn on all the IIS components and just run the /get-features line and the AdminCenter line after it. The reason for running Admin Center again is because it shows up in the list before its pre-req so it fails to enable the first time around, so you just enable it again and viola...
Update 2: I modified the script and had the WiseScript call it because SCCM kinda blows. I had to modify the script because calling it with WiseScript tripped the issue with DISM reverting to the x86 version, which errors out, so now it's pointing to the SysNative version (another brilliant idea from microsoft, I guess calling it dism64 or defaulting to x64 and not x86 or about fifty other options made too much sense and therefor had to go).
XenServer: Create RAID SR.
A quick How-To: on adding a RAID array as an SR in XenServer, the version I personally used was 5.6 but 5.5 and 5.0 should be identical.
Steps to create an SR in a Xenserver.
Locate the RAID array partition.
cat /proc/partitions
This returns a list of all partitions, find the RAID array and make note of it's name (sda, sdb, sdx, etc.).
Now locate the disk-id.
ll /dev/disk/by-id
This lists disk ID's, look for the ID that matches the partition name from the previous step.
Obtain the XenServer host-uuid, we need this because we need to specify the XenServer as the host to attach the SR to in the next step.
xe host-list
Create the SR.
xe sr-create content-type=user device-config:device=/dev/<sdx> host-uuid=<host-uuid> name-label=”RAID Array” shared=false type=lvm
You should now be able to see (and use) your RAID array in XenCenter.